Ever since I was a kid, I was fascinated by the process of developing film. As a teenager, I worked on my school’s yearbook staff as a photographer. I developed film and made prints in my school’s darkroom.
Over the years, I acquired my own darkroom equipment and took it with me wherever I went – moving from place to place and fixing up a bedroom or bathroom to be dark enough to act as a darkroom (since I couldn’t afford to live in a place with a dedicated darkroom).
Today, I’ve gotten rid of most of my darkroom equipment – and I no longer make prints with an enlarger, because I just don’t have space or time to do all that. However, I still develop my own black and white negatives, and then scan them so I can work with them on my computer. I guess you could say I’m a hybrid film developer.
The reason for this post is to give you and idea of what you need and what it would take to start developing film. I’d also like to encourage you to give it a try since it really isn’t that hard. You don’t have to go all the way and build a darkroom to make prints with an enlarger. You can be a hybrid, like me – and develop film in order to scan it and then work with the images on your computer.
If you think you’d like to try developing film, then this is for you. If you want to build a darkroom and start making prints with an enlarger, then this is probably not enough information for you. I’m just going to cover film development – and primarily 35mm film development. I also user other formats, but let’s just start with 35mm since that seems to be the easiest and most popular type of film photography today.
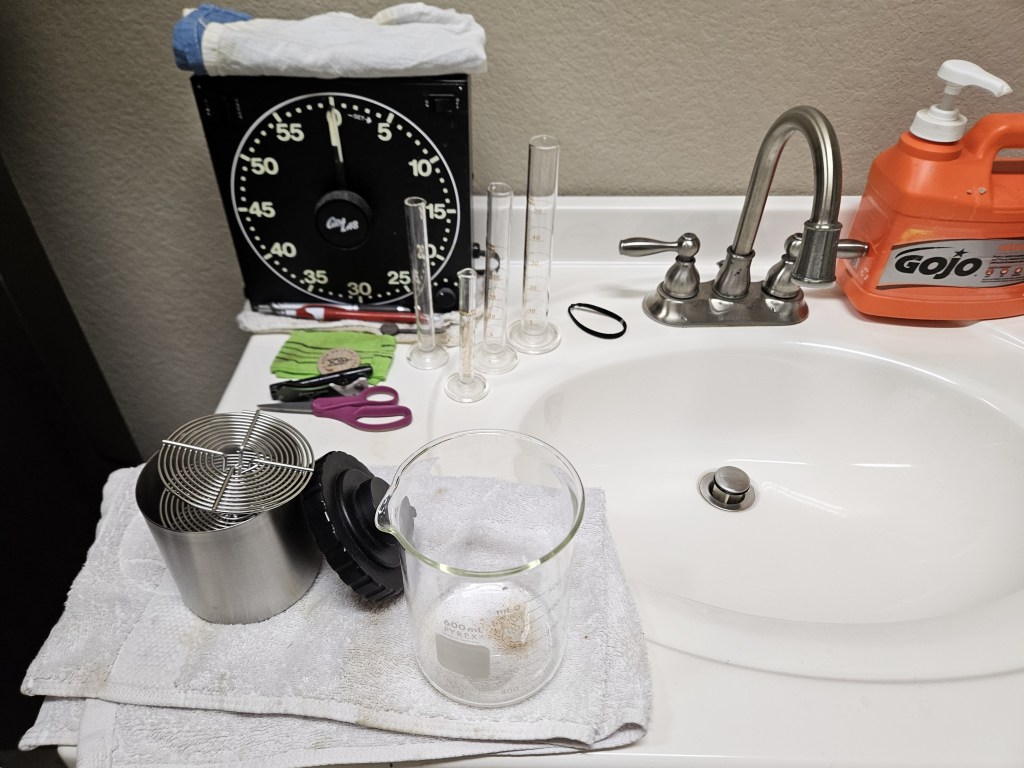
First, you need to understand the basic equipment/items you’ll need if you want to develop your own film. Below is a list:
- Camera that uses 35mm film (or just a role of exposed 35mm film).
- Black and White 35mm film (Kodak Tri-X, Ilford HP-5, etc.)
- Developing tank (examples from Amazon). I prefer the stainless-steel ones, but the black plastic tanks are also very popular. You may need to watch a few videos on loading your tank before you decide which one is for you. Here’s a few YouTube videos on the subject.
- Film clips for drying 35mm film (example from Amazon). I have hung a piece of wire (like the wire used for hanging photos) across the back of a closet, and I hang my clips on that – but there are other ways to hang clips.
- Thermometer
- Measuring cups
- Chemicals
- Developer (I regularly use Kodak HC-110 and Rodinal/Adonol). Here’s a list from B&W film developers from B&H Photo.
- Stop Bath (this is an acid bath that stops the development process. Some people just use water, but acid bath works more quickly).
- Fixer (I use Kodak Rapid Fixer or Ilford Fixer).
- Changing bag (optional – if you don’t have a room that’s dark enough to use to load film in your tank you can use a light proof bag. Here’s some examples on Amazon).
- Counter space, ideally with a sink, to set a few measuring cups with chemicals in them and to set your tank while adding chemicals and between agitations. Be sure the let your tank rest still between agitations as that’s an important part of the development process.
- You’ll also need some kind of timer. I use a dedicated, mechanical timer made by GraLab. Here’s a link to their darkroom timer page. I bought an older model on eBay used. Or you can just use a timer on your phone.
I’ve wanted to post this for quite some time – and it might be easier to show the process in a video, but I’m just going to go through the basics of what you need, and I’ll rely on other people’s videos to show what I’m talking about (there’s plenty available on YouTube – like this one from B&H Photo).
For developing black and while negative film, the steps are pretty simple. A few of the things that will affect your development are total processing time, agitation frequency and length, and temperature. Sometimes in the warm Texas summers, I have to put my liquids in the fridge or freezer for a few minutes to get them down to the needed temperature (68 degrees Fahrenheit is normal) and in the winters, I sometimes need to put them in a hot water bath to raise the temperature a few degrees. You can also adjust the total time up or down depending upon the temperature (higher temps require shorter development times, and lower temps require longer development times), so you don’t have to try to artificially adjust the temp up or down too much. One of the nice things about black and white processing is that it’s very forgiving with things like temperature and processing time. If you go over 30 seconds, or have your temperature a degree or 2 high, it won’t make too much difference. Color film is less forgiving – and you have to pay way more attention to time and temperature than with black and white. You should know though, changing temperature and development time will affect your images. With black and white negatives, there are no colors, but other things can change, like overall density of the image (how dark or light your negatives are) and contrast of your image. So, if you want to increase contrast, you could decrease your exposure time (underexpose) and increase your development time (overdevelop). This should increase your contrast without overly darkening your images (making them too dense). If you experiment with old or outdated film, you may have to increase development time since older films tend to result in underexposure – the emulsions tend to lose sensitivity to light as they age.
Below is a list of the basic steps to develop black and white negative film. This is how I do it. After you develop your own process/workflow you may do it slightly differently. Remember, everyone has their own way of developing, it doesn’t have to be exactly the same as everyone else’s process. One of the important factors (if you want to be able to reproduce good results or correct for bad results) is consistency. Whatever you end up doing, document your steps, times, etc., and try to do things the same way every time. Then if you need to adjust, you can.
- Load film into developing tank (in a dark room, or in a changing bag).
- Measure chemicals and get temps correct (developer, stop bath and fixer).
- Pour developer into the developing tank, and start timer.
- Agitate tank continuously for first 30 seconds
- Agitate every minute after for 10 seconds (others do their agitation differently, but I’ve always done it for 10 seconds every minute).
- Remember, agitation is important at even intervals during the developing process. The non-agitation time (when the tank is left still on the counter between agitations) is equally important to produce quality images.
- After each agitation, it’s good practice to tap the tank on the counter a few times to release any air bubble that might be clinging to the film surface.
- Consistency of agitation is important. Try to develop a rhythm that is consistent in every agitation. This will help your overall process to be reproducible. Remember, you want to be able to obtain the same outcome each time to develop a roll of film. Here’s a YouTube video of one person’s agitation process showing an initial 30 second agitation, and a 10 second agitation after 1 minute.
- Empty developer after development time is up (the process of emptying acts like an agitation – so I turn my tank as I empty it so the developer doesn’t spend more time on one side of the tank than the other.
- Add stop bath and agitate for 30 seconds.
- Empty stop bath.
- Add fixer and agitate (similar to developing, but agitation doesn’t need to be as frequent) for 3-5 minutes. A rule of thumb is that fixing takes twice as long as it takes for your film to clear. Film has a foggy/cloudy/milky appearance until fixed. However long it takes for that cloudiness to clear up is generally half of the time you need to “fix” your film for. After “fixing” your film is no longer sensitive to light – it’s stabilized. I open my developing tank after 30 seconds to see if the film has cleared, then continue soaking my film until it’s done. That’s just a rule of thumb – you will figure out what works for you after you develop several roles. Also follow your particular fixer brand’s instructions/recommendations.
- Rinse film with water at this point. I like to rinse long enough for 10 complete water changes in my developing tank – so several minutes at a slow water flow into your open developing tank. It takes a while to rinse all the fixer from coating the film. If you don’t rinse long enough, the fixer can leave a “film” on your film.
- This water rinse is followed by 30 seconds of rinsing in a clearing/rinse agent to prevent spotting (just as drinking glasses can get water spots, film can also get water spots without a rinse agent after it dries).
- After the rinse agent, some people squeegee the film over the sink to get excess water off. You could do this with a film squeegee tool, or your fingers. I just run the film between my index and middle finger all the way from one end to the other – but this could scratch film if you have something on your finger, so some people prefer to use a clean rubber film squeegee.
- I then hang my film in a dust-free (as much as possible) closet. Depending upon the humidity, it could take a few hours or more to dry. In Arizona or New Mexico, film may dry much faster than in Florida, for example.
These are the basic steps – but my real intent here is to demonstrate how relatively simple black and white development is – and to encourage you to go ahead and give it a try if you’re curious and have always wanted to try it.
Here’s a couple final thoughts. First, you might want to wear rubber gloves. I don’t, and I’ve been doing this for many years – but some of the chemicals are toxic, and you should read and obey any instructions and precautions for any chemicals you use. Also, for best results, all the chemicals or water rinses should be done at close to the same temperature. This provides the most consistency and you should avoid, for example, using hotter water for a rinse – especially very hot water. I tried this once in a college class – I thought I could maybe speed things up a bit – and surprised one of my teachers, who promptly said, “I see you’ve learned about reticulation.” You can look this up (if you’re interested) but an excessively hot water rinse can cause the film gain to clump excessively and create small, circular, spots on your negative. An interesting look, if that’s what you intend. Not so nice a surprise if you don’t intend to do it. Here’s a paper I found on the subject if you’re interested: Photographic Film Reticulation Due to Temperature Changes
during Film Development. And finally, this should be fun. I don’t think I can explain how it feels to go through the development without knowing how the negatives will turn out – and then opening up the film tank and looking at them to actually see images! Of course, it’s disappointing when the negatives are all clear/blank – thankfully, that doesn’t happen often…
I hope this very brief description of what it takes to develop film gives you confidence to give it a try. I hope I’m not scaring anyone away – that’s not my intent. I’ve been doing it for many, many years, so it seems second nature to me. I’ve tried to be as objective and complete as I can in describing what it takes.
If you’re feeling brave, give it a try. I’d love to hear what you think, how things turned out for you, and if you think you’ll ever do it again. It’s not trivial to purchase the items needed, but it is possible to find used equipment at yard sales or on eBay. It is rewarding when it works, and it’s definitely not overly difficult – if it was, I don’t think I’d have kept doing it the same way for the past 50+ years!
