For those of you that don’t understand the basic mechanics of your camera, here’s a brief (and I mean, very brief) tutorial on your camera’s settings, and specifically how to understand and use manual mode.
- The 3 things that control exposure are aperture, shutter speed and ISO (or when I was younger, ASA).
- Modern cameras can handle most, if not all, of these automatically.
- If any of these 3 aren’t set correctly, for the current lighting conditions, your image will be improperly exposed (either too dark or too light).
For someone who’s been studying or doing photography for any length of time, this is second nature – it’s just understood. I hope this is helpful for beginners and those unfamiliar with manual settings, or anyone who wants to switch out of fully automatic mode from time to time.
I’d like to go through how the camera modes work, so that if you’ve never used manual settings, or partially manual settings, you’ll be empowered to try something new. It’s really not hard, it just takes some understanding and practice to get good results (in many cases, results that are better than your camera can do on it’s own).
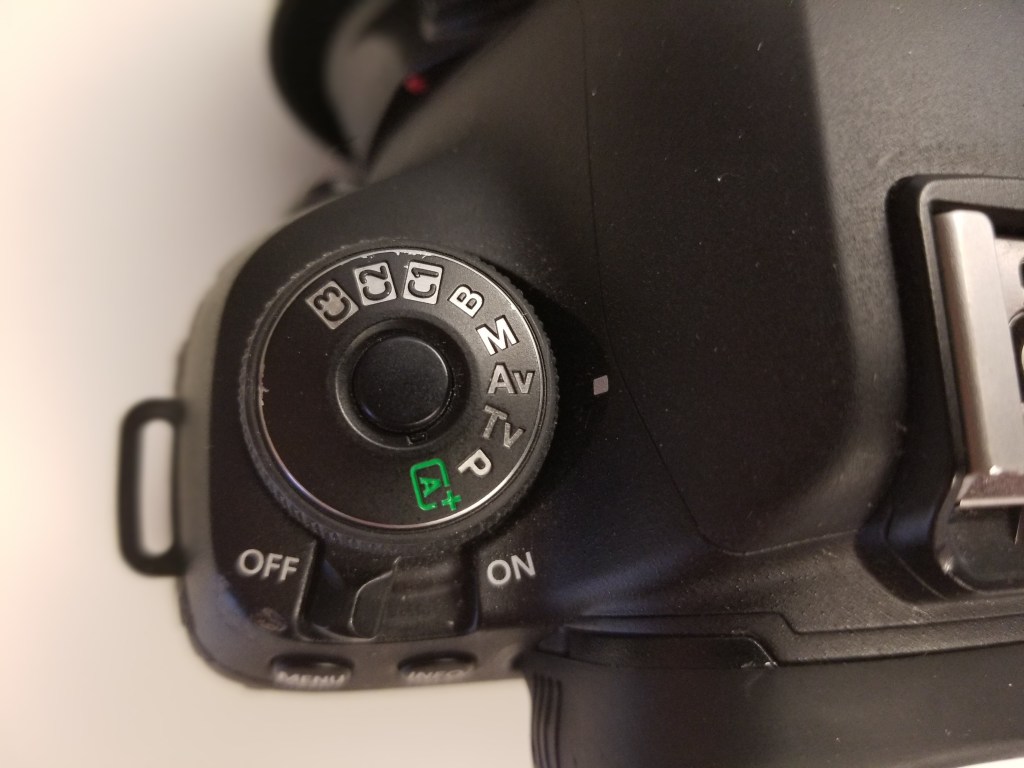
So, if you’re a beginner you may be using the “A” or “Auto” mode on your selection dial. Honestly, I specifically try NOT to use that mode. It controls too many of the settings for you – and you can’t even tweak some settings when you’re in that mode. Also, it may automatically activate your flash (if one is built into you camera) when it thinks it’s necessary. That’s fine, if you want that, but I usually don’t want that. If I want to use flash, I will activate it myself. When I’m shooting quickly and don’t want to mess with any settings, I generally choose “P” which is a general purpose Programmed mode. It will try to pick the best settings – but it also allows me to tweak things a bit.
Let’s look at 3 more modes: Av (or A), Tv (or S) and M. These are modes that can allow us be most creative.
Av (or A)

This is aperture priority. It will let you choose the aperture, or lens opening, and the camera will adjust other settings to give a good exposure. When might you want to be in complete control of the aperture? Well, to answer this, we should think about what the aperture does, and how it impacts the image. The most important impact of aperture is something called “depth of field”. Depth of field controls how much of your image/subject appears sharp or in focus. A smaller aperture (f/16 or f/22, for example) will result in more of your image appearing to be in focus. A larger lens opening (f/1.4 or f/2.0, for example) will result in less of your image appearing to be in focus. Like the nesting santas above, a large lens opening was used to cause only the front of the first santa to be in focus, everything else is blurry. So, for certain types of images, like still lifes, or landscapes, this is important to know about, and to control if you can. Your lens aperture can give you some control over this.
Tv (or S)
 This is shutter priority. In this mode, you will choose a shutter speed, and the camera will adjust other settings to give a good exposure. This is more critical when you’re shooting something like sports, or anything moving. You may not want to freeze the motion, you may want to allow it to be blurry (like my dog & boy in motion image). In shutter priority, you choose your shutter speed based upon the effect you want to achieve – either an image frozen in time, or an image that is blurred, to emphasize the motion.
M (Manual)
Now, this is where it gets a bit tricky. In manual mode, you are taking your camera back to the days before any automatic features at all (almost). In this mode, you have to decide on the shutter speed AND aperture you want to use. You have the most control in this mode. So, when would you want to do this? Well, in my experience, and the times when I use it most, are times when your lighting won’t be changing much. A studio situation is a good example of this, when the lighting is set and won’t change. Sometimes I use it when I’m shooting high school football or soccer at night with lights. Under stadium lighting, there is very little change in light – so I’ve gone a whole game with manual settings not changing at all. I pick the best manual settings at the start of the game, and leave my camera in manual mode without changes. Mid day, for a day game could be done this way, but towards dusk, the light changes quite a bit, so if I do use manual settings at dusk, I will need to check my settings from time to time and adjust based upon conditions.
ISO
So, now we understand the various modes – but there’s one other factor that impacts exposure, and that’s ISO. ISO is basically how sensitive to light your camera’s sensor will be. In the old days, it was a property of the film you were using – so I could buy 100 ISO film or 400 ISO film – depending upon what I was shooting.
In modern digital cameras, setting the ISO is just telling the camera how sensitive you want the sensor to be. So, why not just leave it at the highest setting and forget about ever changing ISO? Well, you don’t get anything for free – and the higher you set your ISO, the more noise your image will have. With film, it causes grain, which reduces quality just like noise does in digital images. So, in general, it’s technically better to use as low an ISO as possible – to keep the image quality as high as possible. Newer digital camera sensors are getting better and better at preserving quality at higher ISOs, but there is still a degradation in quality with you go higher.
Some cameras also have an auto setting for ISO. If yours doesn’t, then you have to pick an ISO. I suppose this is a bit confusing – but for me the only thing confusing is auto, because I learned with film. With film, you set your camera to a specific ISO for the whole roll. This was a fixed thing that you could only change by changing your film, or developing your film differently to accommodate the desired ISO (if you buy ISO 400 film, for example, it’s possible to “PUSH” the film to a higher ISO as long as you adjust the development time accordingly, which allows you to take photos at night or indoors, with better results). The idea of changing ISO whenever you want is, to me, cool and extremely crazy at the same time – just because of my film background.
So, what does this all mean?
Now you know the modes and settings that impact exposure – so it should make sense to you now that setting your camera to “M” and just shooting may or may not result in correct exposures (depending upon how lucky you are). So, if you switch to manual mode, how do you know what the correct exposure is? Well, thankfully your camera has a light meter – to measure the amount of light in the scene you’re trying to photograph. That’s how it’s able to set the exposure in the auto or semi-auto modes for you. So, you could set your camera to an auto mode, see what settings it would use (what aperture and shutter speed, and potentially ISO too) and then use those settings in manual mode. You could also use the meter in your camera in manual mode – when you look through the viewfinder, you should see some exposure information (like below).

In the center is a scale with “-3, 2, 1” and “1, 2, 3” and a center mark that indicates where the needle should be aligned to achieve a good exposure. Currently the needle indicates a slightly greater than 1 stop over exposure. This display also shows the current shutter speed, aperture, and ISO as well as some other helpful info. This is the display from a Canon 5D Mark III – so your camera will look different, but the basics are the same. Keep in mind, getting the needle in the middle is just a suggestion, or a starting point. If you shoot a couple images, and they’re too dark, over expose a bit. You can also use a hand held light meter (like in the old days) to check lighting wherever you are – but the meter in your camera is probably just as good for most metering needs.
I know I’ve encouraged this before, but go rogue, go off the grid, start shooting in manual mode! I’d love to hear about your adventures.

You must be logged in to post a comment.